C++ Project Design Workshop: Part 1
During March and April of this year, I coordinated and taught a C++ Project Design workshop at Bergen Community College. This serves as an introduction to programming in C++, as well as some introduction to Linux and software development ideologies, such as Agile.
This was a four-part workshop, each lesson an hour long.
This post contains the first lesson of the workshop.
Workshop Outline
- Setup (today!)
- Programming fundamentals
- Project introduction
- Software methodologies
Today’s Outline
- Install Linux on a VM (if necessary)
- Install Git and VS Code
- Create a GitHub account
- Write commit messages and comments
- Know parts of a computer, compilation, how to create a program
1. Install Linux 🐧
If you already use Linux or MacOS, hang tight! This is for Windows users.
- Download VirtualBox
- Download the ISO image for Xubuntu
Setting Up a New Virtual Machine in Virtual Box
- Upon opening VirtualBox, hit
Newto create a VM. - Be sure to select the Xubuntu ISO image for
ISO Image. - Uncheck
Proceed with Unattended Installation.
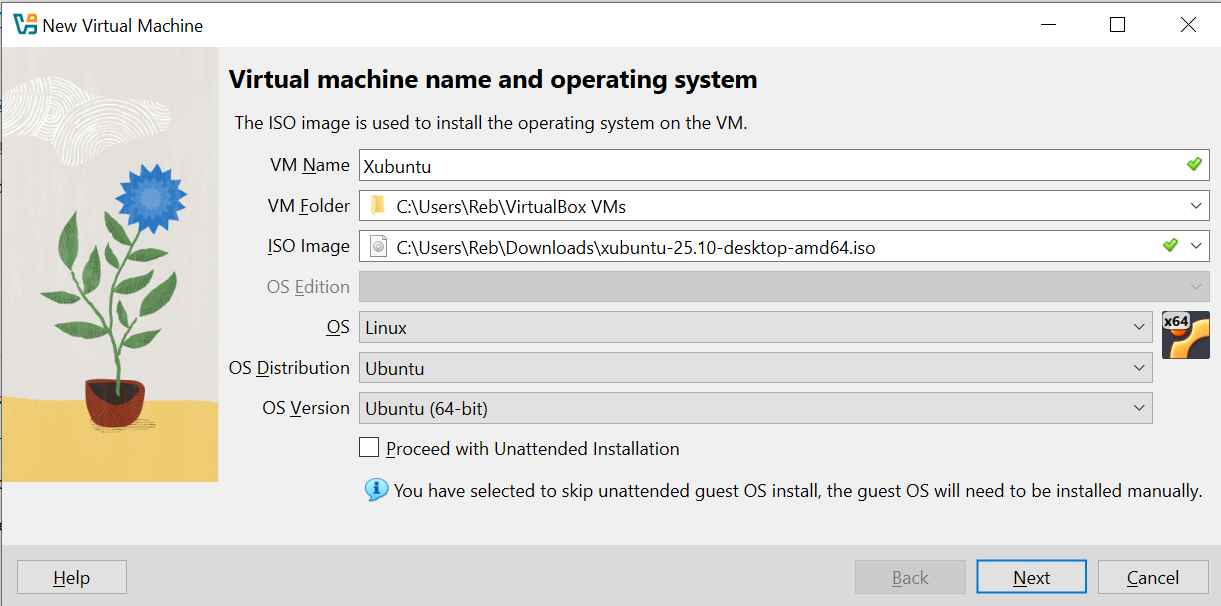
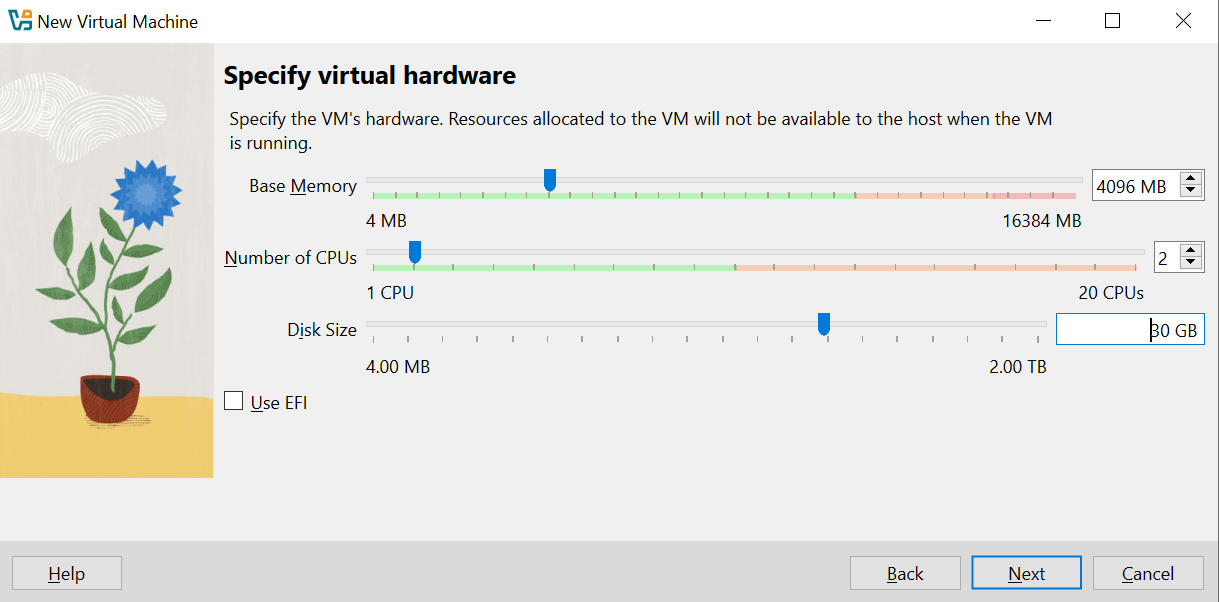
- Allocate your
Base Memory(at most half of your total RAM) and 2 CPUs. - Allocate at least 30 GB for your virtual hard disk.
- Select
Finish.
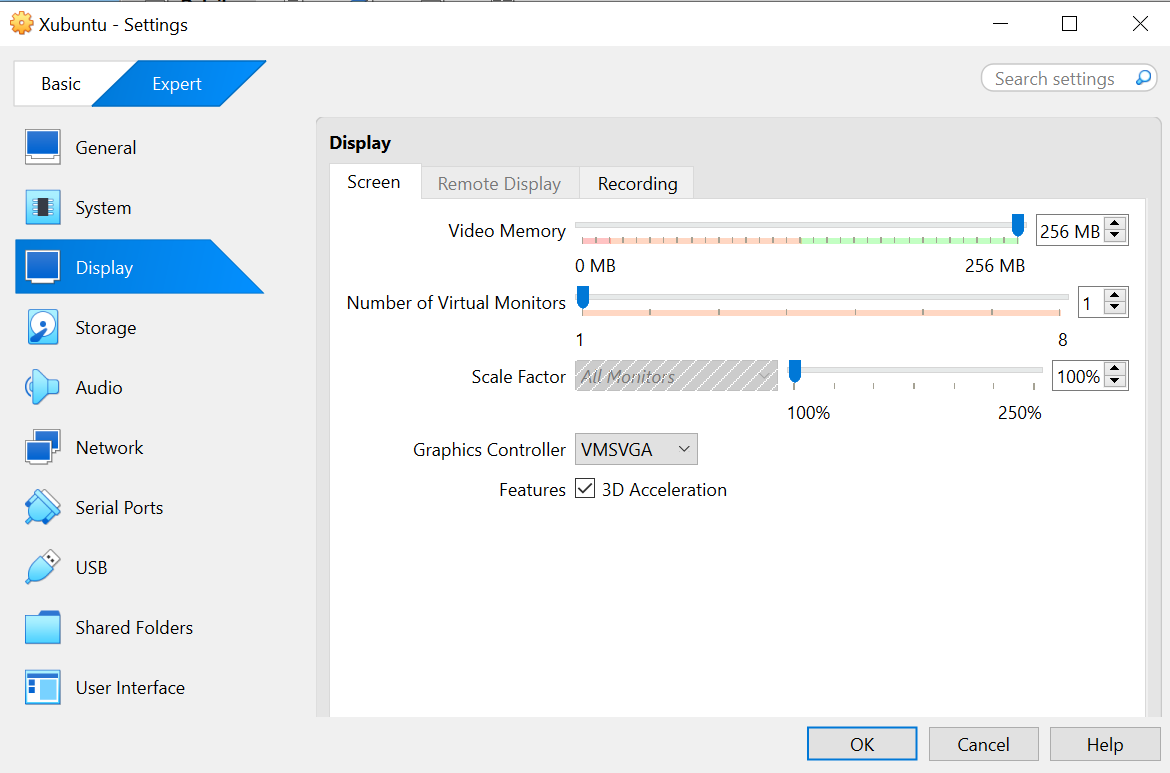
- Click
Settings>Expert>Display- Enable
3D Acceleration - Increase
Video Memoryto 256 MB (the max)
- Enable
Setting Up Xubuntu 🐀
Follow the on-screen instructions when installing Xubuntu!
Post Installation Steps
- Open the terminal with
CTRL + ALT + tand enter the following:sudo apt update - Now, upgrade your packages:
sudo apt upgrade - Install two packages, which will help us install Guest Additions (that’ll help Xubuntu use the VM’s hardware):
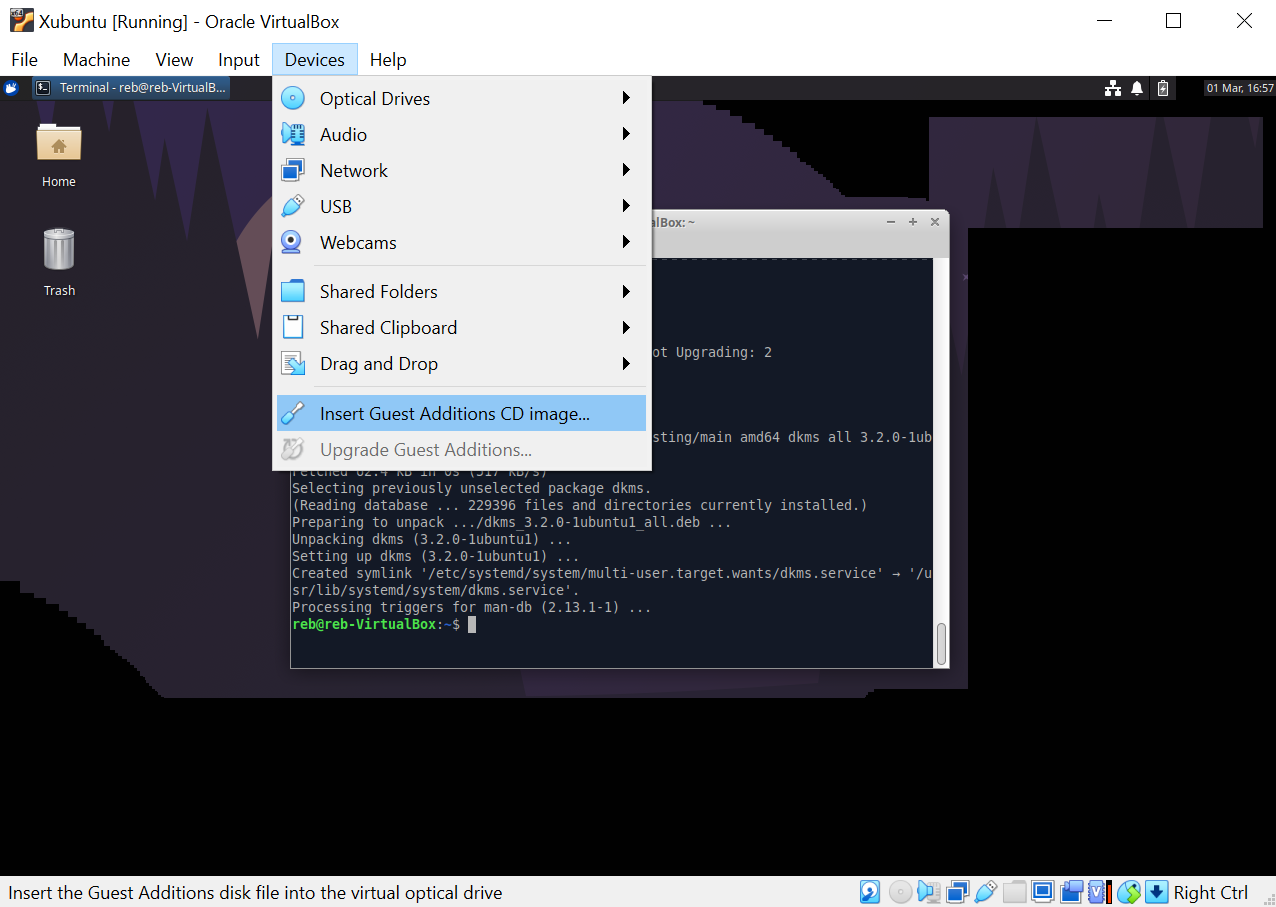
sudo apt install build-essential dkms - Install Guest Additions:
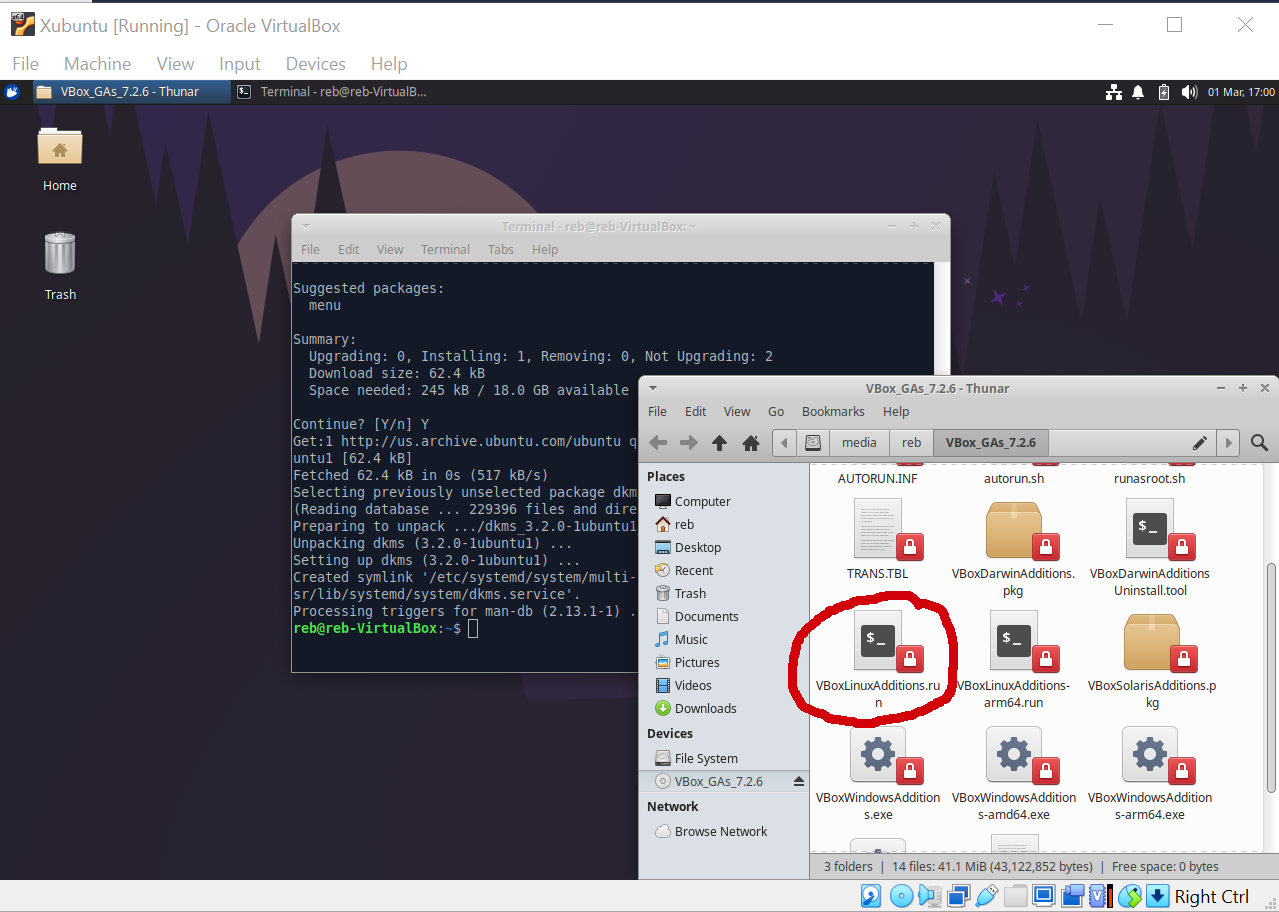
Devices > Insert Guest Additions CD image...and findVBoxLinuxAdditions.run. In your terminal, typesudoand then dragVBoxLinuxAdditions.runinto the terminal. HitENTERto install the Guest Additions.
- Reboot with
sudo reboot. You should have less lag or performance issues now! - Eject the Guest Additions image.
2. Install Git and VS Code
On Linux
Open the terminal with CTRL+ALT+T and enter the following
sudo apt install git
To install VS Code, download the .deb file. Locate the file and then install with
sudo apt install ./codefilename.deb
On MacOS
Install Homebrew, a popular package manager for MacOS among developers. Follow the install instructions.
To install VS Code, enter
brew install --cask visual-studio-code
To install Git, enter
brew install git
3. Creating a GitHub Account
Create an account on GitHub.
Configuring Git
git config --global user.name "John Doe"
git config --global user.email "johndoe@example.com"
git config --global init.defaultBranch main # The default branch used to be master
git config --global pull.rebase false # Sets default branch reconciliation; safer than rebasing
Check that the appropriate changes were made. 👇
git config --get user.name
git config --get user.email
MacOS: Configuring Git
echo .DS_Store >> ~/.gitignore_global
git config --global core.excludesfile ~/.gitignore_global
This tells Git to ignore .DS_Store files, which has to do with Finder.
Create an SSH Key
An SSH key is a secure identifier used to identify your machine.
ls ~/.ssh/id_ed25519.pub # Check if you have an Ed25519 algorithm key installed
ssh-keygen -t ed25519 # Create one if not
When prompted, the password is used to encrypt the private SSH key stored on your computer. Enter one if you want; not required.
Link Your SSH Key to GitHub
- On GitHub, go to:
Settings>SSH and GPG keys>New SSH Key - Name the key descriptive to your machine, something like
thinkpad-xubuntu - Copy your public SSH key and paste it into the key field
cat ~/.ssh/id_ed25519.pub
Test Your SSH Connection
- Enter the following in the terminal
ssh -T git@github.com - Verify that the fingerprint in the message matches GitHub’s public key fingerprint and enter
yes
4. Using Git: Commit Messages (and Comments)
Git is a version control system (VCS).
A VCS tracks changes to code over time, allowing people to revert to an old version, create multiple branches, commit current edits, and push changes to the web for collaboration. It’s a really advanced save feature.
Think of Google Doc’s version history, but on steroids.
You can read more about version control systems on Pro Git.
Git vs. GitHub
Git is a program that works on your local machine.
GitHub is remote storage, where you can showcase your projects and collaborate with other developers.
The Git Workflow
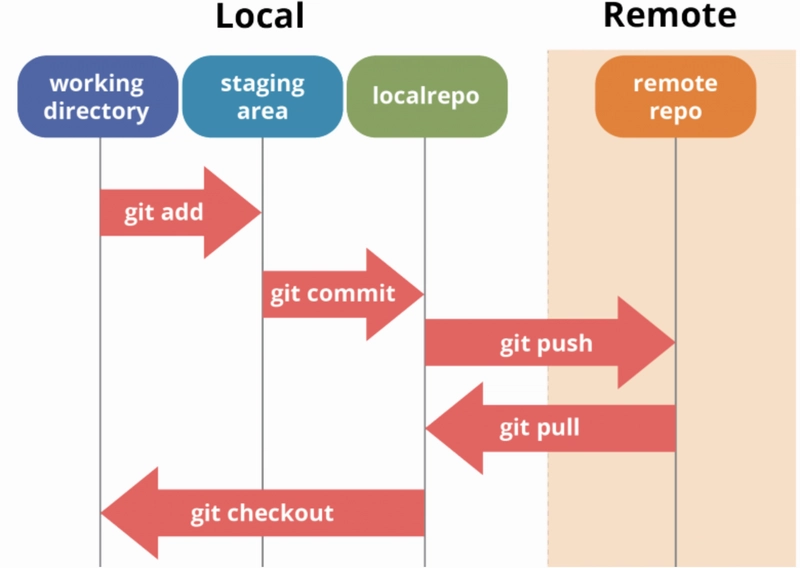
^ From UW.
As you write code, you will want to periodically snapshot (or capture) your changes, which is accomplished with git add and git commit. These commits make up your version history. When you want to publish the changes, you will git push to GitHub. When you want to update your local repository, you will use git pull.
Creating and Updating Repositories
A repository (repo) is a location or “container” that stores a project’s code, commit (version) history, and files.
When you want to get a local copy of an online repository, you clone it to your local machine.
As mentioned, when you want to get the latest updates from the online repository, you pull them to your local machine. And when you make changes, you push them to the online repository.
Making Changes
- Make changes
- Stage changes
- All of these files will share the same commit message
- Use
git add <filename or . to add all files in your current working directory>
- Commit changes
- Create a snapshot of your changes
- Use
git commit -m "Your commit message here"
Basic Git Syntax
program | action | options (optional) | destination

git commit -m "Message"
git add . # The option is omitted
Try: Create a Repo
- On the GitHub homepage, create a new repository. Name it “test.”
- To clone your repository to your local machine, copy what’s in the SSH option.
- In your terminal, create a directory called
reposand navigate into it withcdmkdir repos cd repos/ - Now, you are in your
reposdirectory. Clone your repo:git clone git@github.com:USERNAME/REPO-NAME.git - Navigate into your repo:
cd test
git remote -v # Checks the repo's connections
Try: Create a File (or Two)
- Create a new file called
helloworld.txtin yourtestrepo withtouch helloworld.txt. - Enter
git status, which shows what files are being tracked. - Enter
git add helloworld.txt. This adds your file to the staging area. Typegit statusagain. - Enter
git commit -m "Create helloworld.txt"and thengit status. - Type
git logto see your entry for the commit you just made. - Now create another file called
README.mdand write some text in it. Be sure to save the file and stage it. Make your commit message descriptive withgit commit -m "Create README.md". - Type
git push origin mainto push the changes you’ve made locally to the remote repo. - Type
git status. - Refresh your repo’s page on GitHub. What do you see?
Change the Git editor
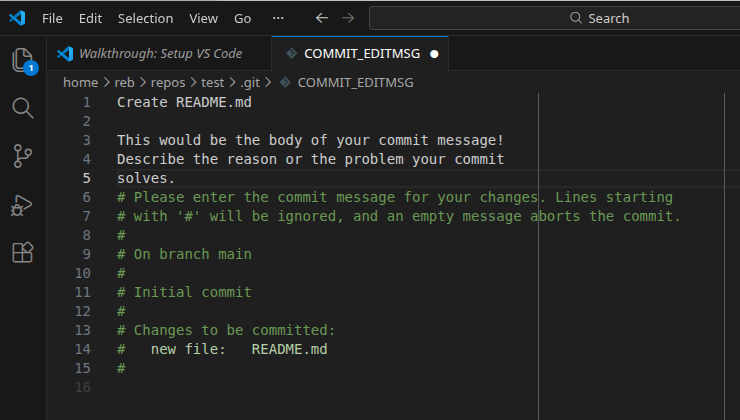
If you type git commit without -m, you will write your commit message in Nano or Vim. To have it open in VS Code instead, enter this into your terminal:
git config --global core.editor "code --wait"
That being said, omitting the -m allows you to write a body for your commit message. Keep in mind that the subject line has a 72-character max on GitHub.
Tips for Writing Good Commit Messages
- Make atomic commits, which are commits that refer to only one feature or task
- Commit every time you make a meaningful change
- Use an active voice: “Fix grid layout”
- Keep your syntax consistent:
- Capitalize the first letter in your subject line
- Don’t end the subject line with a period
- Wrap text at 72 characters
- The body should explain the why for the commit, rather than how (as the code explains it)
See this article by cbeams for more.
Git Cheatsheet
git clone git@github.com:blah/blah.git
git push origin main
git pull

git add .
git commit -m "Commit message"

git status
git log
5. Parts of a Computer, Compilation, How to Create a Program
What’s Inside a Computer?
- Motherboard
- Processor (CPU)
- Random Access Memory (RAM)
- Storage (HDD, SSD, floppy, etc.)
- Graphics Processing Unit (GPU)
- Power Supply Unit (PSU)
- Fans, heat sink (for cooling)
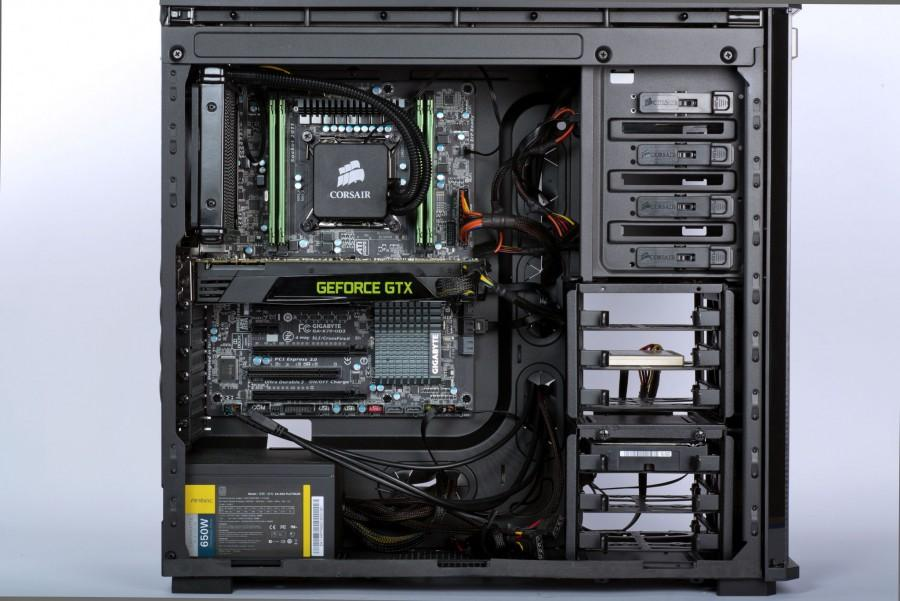
^ From FHC Today.
Compilation Overview
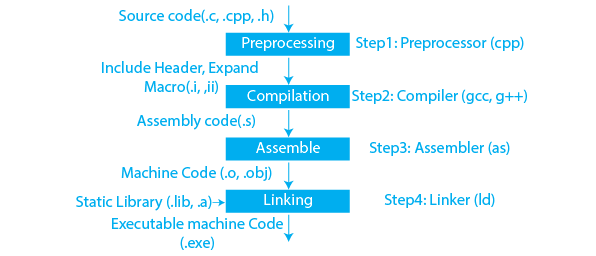
^ From PrepBytes.
- Source code (
.cppfile) - Preprocessor/macro expansion
- Processes the
#include,#define,#ifdefs - Converts C++ code to C++ code
- Processes the
- Compiler
- Converts C++ to assembly (
.s)
- Converts C++ to assembly (
- Assembler
- Assembly to machine code/binary object files (
.o)
- Assembly to machine code/binary object files (
- Linker
- Take object files and resolves external functions into executables
- Gets libraries (
.so,.dll,.dylib)
- Executable (sent to CPU)
General Steps to Creating a Program
- Define what the program does
- Create a model of program - it may help to draw diagrams!
- Write source code
- Compile source code
- Correct errors found during compilation
- Create an executable and run program, using test data for input (try breaking your program)
- Correct errors and validate the results of the program